

How to Apply Press-On Nails for a Secure, Natural Fit
For a secure, natural-looking fit, choose press-on nails slightly smaller than your natural nail beds, prep your nails, then press each nail firmly into place. Learning how to apply press on nails with adhesive tabs is simple: position the tab, align the nail, and hold it for about 20 seconds.
Nail glue isn’t the only way to get a neat set. Adhesive tabs can suit a short-term manicure or a single event, while glue is an option for a longer-wearing look. Careful sizing and smooth preparation matter more than rushing the placement.
This guide explains how to size each nail, prepare your natural nails, and apply press-ons with tabs or glue. Taking your time can help the set feel comfortable and look natural.
Key Takeaways
- Keep nail glue on the nail plate, away from your cuticles, and adjust where you apply it to suit your intended wear time.
- Shape and cleanse your natural nails before application so the surface feels smooth and ready for your press-ons.
- Use adhesive tabs when you want a temporary set for a few days or a single event.
- For removal, soak your nails in hot, soapy water for 10 to 15 minutes, then ease the press-ons off gently.
Applying nail glue
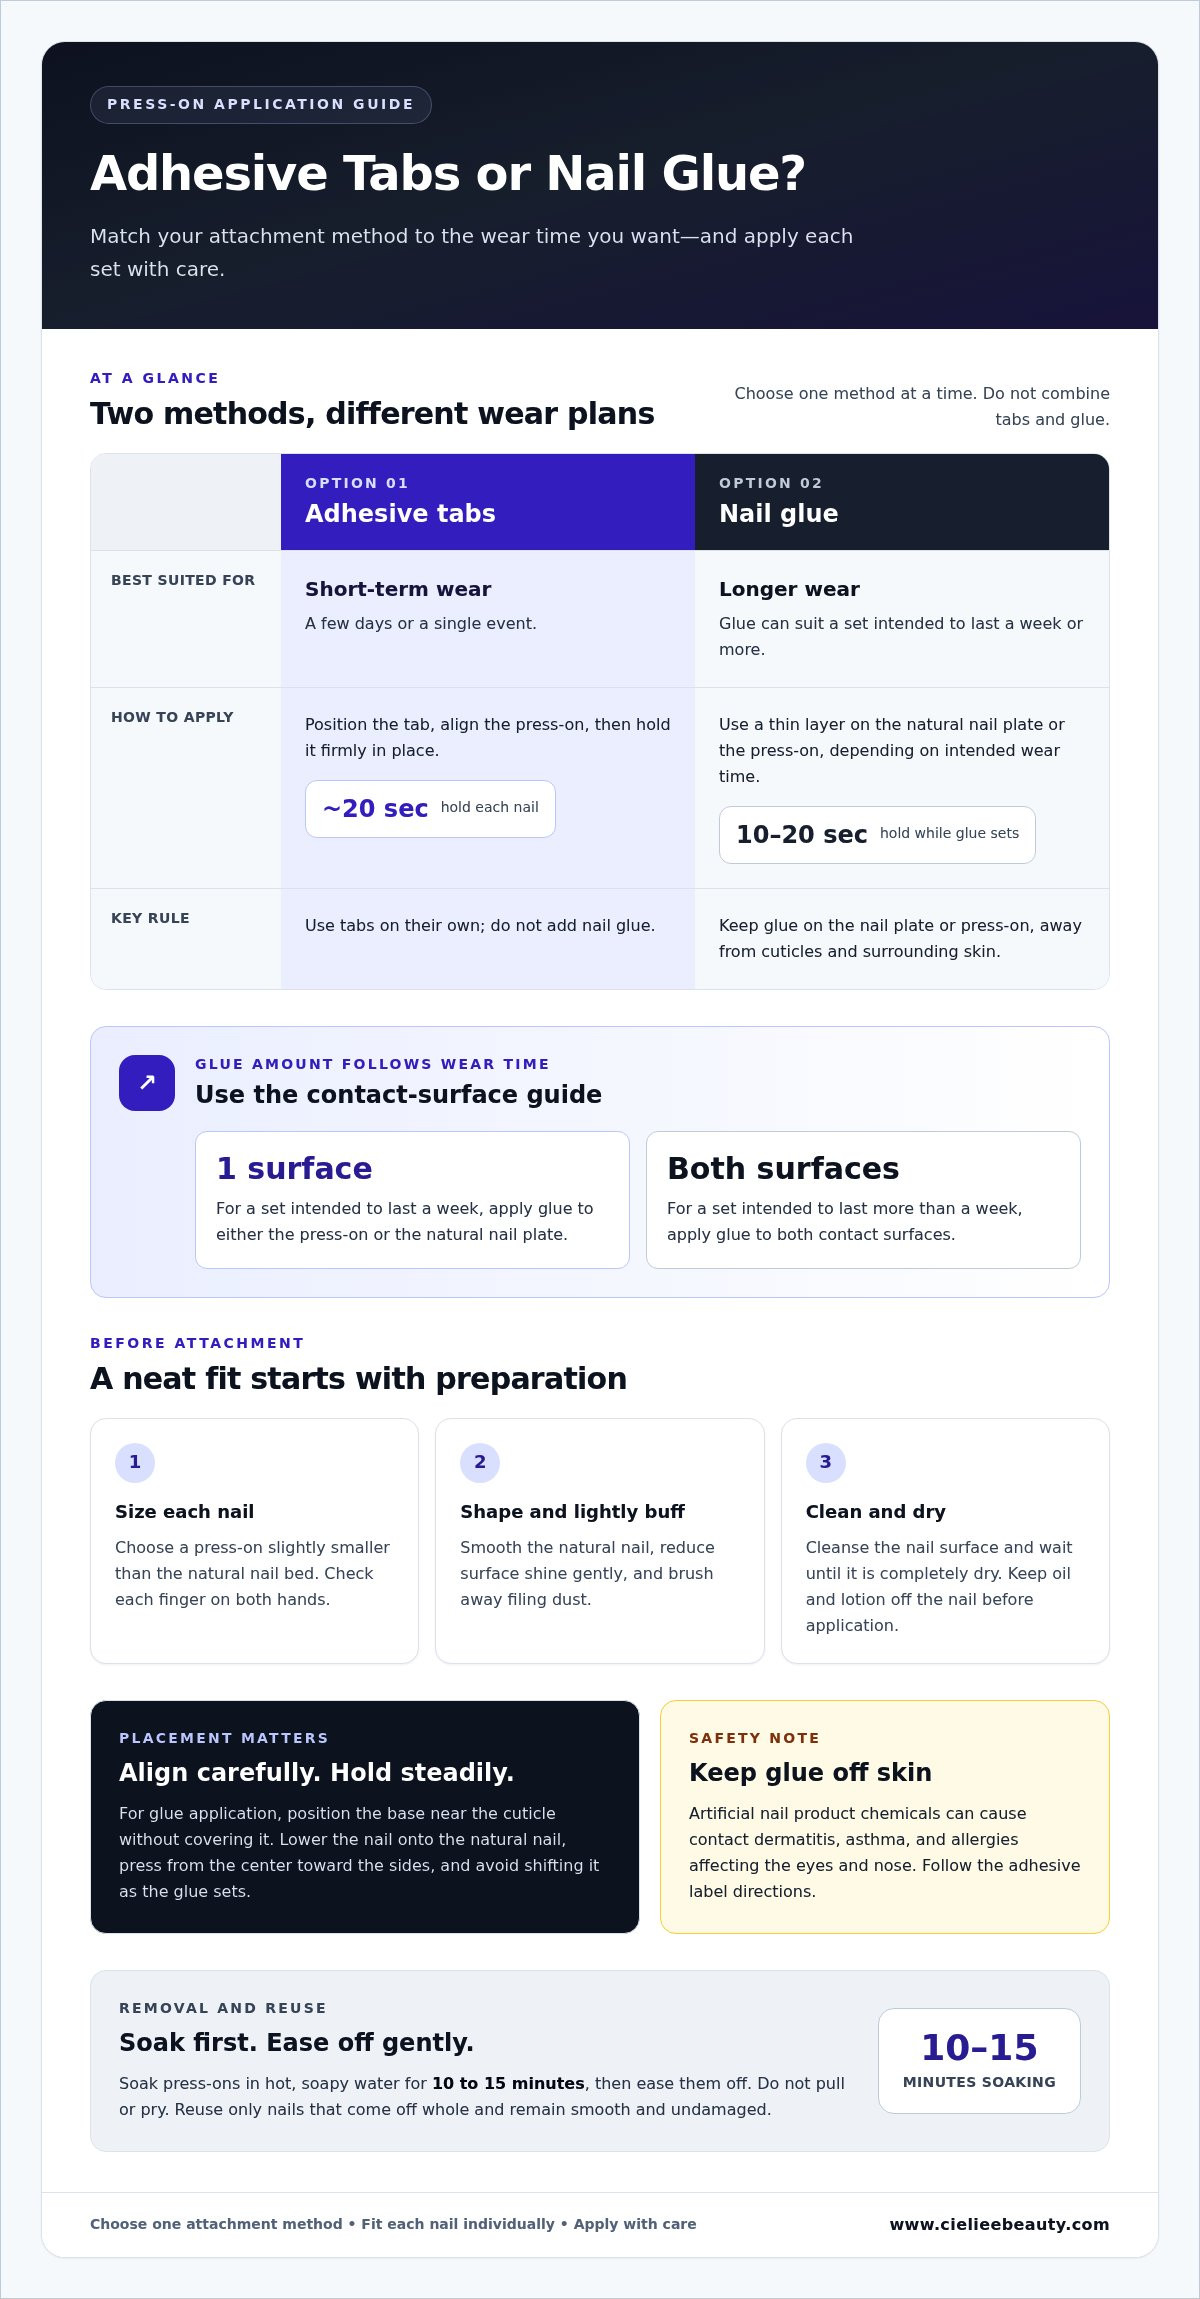
To learn how to apply press-on nails with glue, start with careful placement and steady pressure. Hold each press-on down for 10-20 seconds while the glue sets. Adhesive tabs suit a few days of wear or a single event. For a set intended to last a week, apply glue to one surface only. For more than a week, apply it to both surfaces.
- Choose one attachment method. Use nail glue or adhesive tabs, not both together. Combining them can make a press-on sit unevenly and complicate removal. Choose based on the occasion and follow the adhesive’s directions.
- Apply glue carefully. Use a thin layer on the natural nail plate or the press-on, depending on intended wear time. Keep glue away from the cuticle and surrounding skin.
- Align the press-on. Position its base near the cuticle without covering it, then lower the nail onto the natural nail. Press from the center toward the sides to limit trapped air.
- Hold it steady. Keep the nail pressed down for 10-20 seconds. Avoid shifting it as the glue sets, then repeat the same process on each finger.
- Remove with care. Soak press-ons in hot, soapy water for 10 to 15 minutes, then gently ease them off. Don’t pull or pry, since force can damage natural nails.
- Reuse only intact nails. A press-on can be reused if it comes off whole and remains smooth and undamaged. Skip cracked or bent nails, or pieces with leftover glue that prevents a neat fit.
Chemicals in artificial fingernail products can cause contact dermatitis, asthma, and allergies affecting the eyes and nose, according to the National Institute for Occupational Safety and Health (NIOSH). Keep glue off your skin and follow the label directions.
Choose the attachment method to match how long you plan to wear the set: tabs suit a few days or a single event, while glue can suit a set intended to last a week. For week-long wear, apply glue to just one contact surface, either the false nail or the natural nail plate. Use one attachment method at a time.
Choosing the correct press-on size
Choose a press-on slightly smaller than each natural nail bed. Compare the width and shape for every finger; a close fit looks natural and feels comfortable.
-
Match Press-Ons to Each Finger
Lay out the press-ons and match one to each finger, from thumb to pinky. Compare each piece’s curve and width with the natural nail bed, choosing a size slightly smaller for a closer fit. Don’t assume both hands need identical sizes. Check each nail individually, then set the pieces aside in finger order.
-
Check Nail Size and Fit
Place each unglued press-on over its natural nail to test the fit. The edges should cover the nail without extending onto the skin or pressing into the sidewalls. If a piece looks too wide, try the next smaller size. If it’s too narrow, it may leave part of the natural nail exposed, so check both edges before choosing.
- Arrange the selected sizes in finger order before starting. Keep each hand’s set together, with the thumbs and pinkies easy to distinguish. This makes it less likely you’ll apply the wrong size, especially when several pieces look similar. Recheck the matches before preparing your nails.
- Choose a shape and length that work for your everyday routine. Shorter press-ons may feel more practical for typing, while a longer shape makes a more noticeable manicure. Consider how each shape follows your natural nail and finger, not just how it looks. Each selected nail should sit evenly before application.
- Make any final adjustments before attaching the press-ons. If one feels unstable or sits unevenly, test another size rather than forcing it into place. Keep the chosen pieces in order and check each fit again. A consistent fit across both hands creates a balanced look without pushing any nail onto the skin.
Filing, buffing, and cleansing natural nails
Before applying press-ons, soak your natural nails in warm water for a few minutes to soften the cuticles. Then shape and lightly buff each nail, and cleanse the surface to prepare it for adhesive.
-
File and Shape Natural Nails
File each natural nail into a shape that sits neatly beneath its matching press-on. Use gentle strokes in one direction to smooth rough edges without filing the skin. Check the sidewalls and tip for snags, which can affect how the press-on sits. Keep the natural nail lengths consistent across both hands for a balanced finish.
-
Buff and Cleanse Nail Surfaces
Lightly buff the nail surface to reduce shine, using a soft touch so you don’t thin the natural nail. Brush away filing dust, then cleanse each nail to remove residue from between the nail plate and adhesive. Nail primers are intended to dehydrate the surface and wash away lipid particles, according to the National Center for Biotechnology Information.
- Soak your fingertips in warm water for a few minutes before shaping to soften the cuticles and make the surrounding skin easier to work around. Dry your hands thoroughly afterward, including the nail folds. Moisture can interfere with a clean application, so wait until each nail feels completely dry before continuing.
- Keep the cuticle area clear as you prepare each nail. If loose skin lies over the nail plate, don’t file or buff that skin. Work only across the hard nail surface and along its free edge. A clean outline gives the press-on room to sit without overlapping the surrounding skin.
- Finish by checking every nail in good light. Look for dust, moisture, or glossy patches, especially near the side edges, and clean those areas before applying adhesive. Save hand lotion and cuticle oil for after the set, since oil on the natural nail can interfere with direct adhesive contact.
Applying press-on nails with adhesive tabs
- Lay out your set. If you’re learning how to apply press-on nails for temporary wear, adhesive tabs offer a glue-free option for a few days or a single event. Arrange each press-on in finger order before peeling any backing. This keeps the next size within reach and helps you work steadily, one nail at a time.
- Choose a matching tab. Compare each tab with its natural nail. It should cover the nail plate without reaching the cuticle or side skin. If a tab extends beyond the nail, choose a smaller one. A tab that’s too small may leave parts of the press-on unsupported.
- Place the tab smoothly. Apply one tab to a clean, dry natural nail, then smooth it from the center outward. Avoid stretching the tab, which can create wrinkles. Check the edges before removing the protective backing, and keep fingers away from the exposed adhesive.
- Position the press-on. Knowing how to apply press-on nails with tabs means aligning each piece before pressing down. Set the base near, but not over, the cuticle. Lower the press-on carefully, checking that its sides follow the natural nail rather than resting on surrounding skin.
- Press and hold. Hold each nail in place for about 20 seconds, using even pressure across the center and sides. Keep your finger still during that time. Repeat the process across the set, checking the placement before securing each press-on.
- Inspect the finished set. Look at each nail from above and from the side. Check that no tab is visible beyond the press-on’s edge and that each nail sits flat. If you spot a lifted corner immediately, adjust the placement before moving on to another finger. A tidy edge helps the finished set look neat.
Glue tabs are suitable for wearing for a few days or for a single event, so consider the planned duration when choosing them. They fit a short-term plan rather than one that calls for longer wear. If your intended use is limited to a few days or a single event, adhesive tabs are an option to consider.
CIELIEE BEAUTY
Once you’ve learned how to size, prep, and apply press-on nails, CIELIEE BEAUTY is a natural next step for exploring your beauty routine. Turn to the brand when you’re ready to continue beyond these application tips and discover what feels right for your personal style. Keep your approach simple: choose options that suit your routine, your preferences, and the look you want to wear.
Whether you’re planning a fresh manicure or considering another beauty ritual, take your time and make it your own. For more about CIELIEE BEAUTY, visit the CIELIEE BEAUTY website.
Make Your Next Set Your Own
A press-on manicure can be more than a finished look. It can become a small creative ritual that fits into your day. With practice, you can find the shapes and finishes you enjoy and carry those preferences into your next set.
As you learn how to apply press-on nails, notice which parts of the process you enjoy and what you’d like to refine. Your style can shift with your plans, mood, or daily routine, so there’s no need to make every manicure identical. Let each set reflect what feels right and give yourself room to experiment.
If you’d like a little guidance as you explore your beauty routine, contact CIELIEE BEAUTY for help. Keep it relaxed, enjoy the process, and let your next look feel like your own.
Frequently Asked Questions
Should I use nail glue or adhesive tabs for press-on nails?
Choose adhesive tabs for a short occasion or a few days, and nail glue for a longer-wearing set. For example, tabs may suit a one-night event, while glue can work for a set you plan to wear longer. Use one attachment method at a time and follow the adhesive’s directions.
How can I make press-on nails stay on longer?
Start with a close-fitting press-on and clean, fully dry nails; then avoid getting your hands wet immediately after application. For glue, press each nail down for 10-20 seconds while it sets. Keep glue off your cuticles, and don’t use tabs and glue together. Careful placement and following the adhesive’s directions support a more secure fit.